Welcome to Nick Smith's 'How-to-Airbrush' tutorial blog
This blog will link to my 'youtube' tutorials and will provide another look at what I did. Sometimes, the language barrier or my 'Black country' accent may make it difficult to understand what I said. So if English isn't your first language you can translate this text for further explanation.
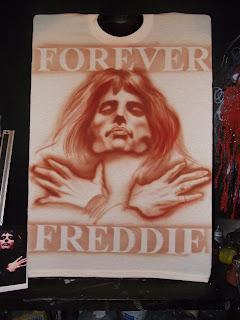
Today's tutorial - Freddie Mercury
This image is familiar to most people due to Queen's Bohemian Rhapsody video. However this image was first concieved as a photoshoot by Mick Rock and was used on the Queen 2 album cover.. Freddie had the inspiration from an image of Marlene Dietrich.


It's a very striking image that uses a single powerful spotlight effect to creat a dynamic 'chiaroscuro' lighting. We are going to attempt to recreate that effect using an Airbrush. (The Badger 'anthem 155' double action airbrush to be specific) http://www.badgerairbrush.com/Anthem_155.asp
I will be using Badger
SPECTRA-TEX® PAINTS http://www.badgerairbrush.com/Spectratex.asp
People email me asking how to make stencils. Well in this example I'm going to give you my actual stencil artwork before I cut them out. Print them off, paste onto some thin card, cut-out with a scalpel and you're away. (What a nice man I am!).


I have added the text 'Freddie Forever' in 'Times New Roman' capital letters also. However, you can omit this part of the design if you feel it doesn't add anything aesthetically.

You can use old cereal boxes to do this ('Blue Peter' style)- It should look like this before you cut them out:

and afterwards like this:
 Place the text stencil at the top of the shirt and using Badger spectra-tex 'adobe' 55-137 dust over the letters like this:
When done then reveal to look like this:
 Do the same with the face stencil:
 It should look like this, then do the same with the hands:
 Then begin to add contouring to the face, emphasizing Freddie's wide, high cheekbones, thus:
 Then render the hands using the same tonal range as the face, making sure to emphasize their slender, delicate nature:
 This is all the adobe (brown) work done at this point. A quick comparison with the stencil shows how far we have come:
 We will now switch paint bottles: